Search This Blog

Wednesday, March 9, 2011

Erasers and a favourite crafting accessory

My son came to me this afternoon begging to do a craft. We were originally going to do some painting (that boy loves to paint - I have to limit the amount of paint available to him at one time as he'll keep painting and painting until it is all gone, even if that means his project is a few inches thick!)  When we went downstairs to retrieve the paint we came across this:


I've seen some various projects around involving regular sculpey, but I received this kit in a 'crafting care package' from my mom. (She's basically cleaning out her craft supplies and sending them my way - almost like my own little craft store - except it's always a surprise as to what I receive! )

Anyway, my son saw them when I first received the package a couple of months ago and has been begging to do them almost on a daily basis. He's seen these ads on tv for all these stupid delightful little collectible erasers (like, really, how many erasers does one need?! and isn't the purpose of an eraser to, well, erase stuff, not to collect?!  this is my anti pack rat self ranting here).. Anyway, I digress.

Basically, this stuff works like play-doh, you just mold it into the shapes you want and then bake them in the oven for 10 minutes. Pretty cool.


Please don't judge the little critters that I made.


Yes, I made them. This is how my son tends to play play-doh and the like. He gets the stuff out and then instructs me what to make. Yah, so educational and enriching for him, I'm sure.

Anyway, they would have turned out slightly better if dear son had not gone and lost the little rolling pin and sculpting knife that came with the kit. He discovered them, and they disappeared shortly after we received the kit (anything that looks like a weapon...boys).


Now onto one of my new favourite crafting accessories.

I received mine in my stocking this past Christmas and I think it's the handiest little tool.


(source: Lee Valley website)
You see, I don't have a craft room to call my own, so most of my crafting usually takes place on my kitchen table. This little thing is great for laying on the table (it takes the place of newspapers) It's got a glossy finish on it, so if I'm painting with acrylic paints, etc. the spills chip off easily.

If you're anything like me, I tend to get carried away crafting and not notice the time, but will suddenly look up and realize that I need to get busy making supper and need to clean up my crafting stuff in a hurry. Well on this little gem, the corners snap together to make itself into a little tray, then I can just pick the whole thing up and remove it back to my junk heap craft stash in the basement until the next time I'm able to pick up my crafting.

And the best part? It's only 5 smackeroos!  You can find it here.

There are a couple other things there that I have on my wish list, such as their painting triangles and glue spreaders. I bought some of their rare earth magnets last year to use in the quiet book I made for my son for Christmas (post to come soon!) Much cheaper than the ones at Michaels! I love Lee Valley (and no, this is not a paid or otherwise compensated post, I just really love them.)

What about you? Do you have a favourite crafting gizmo, accessory, etc. that you use?


Friday, March 4, 2011

A Very Girly Wreath

A sneak peek!


Since I've only just started this blog, I have a few pre-blog craft projects that I thought I would share with you. I'm still in the middle of decorating little miss' bedroom. She's currently still sleeping in our room, but I'm sick of sharing I think all of us would be better off if she moved to her own room.

Right now our old computer is still set up in her room, but I'm currently in the process of transferring all the files off the old beast and putting them onto my new laptop. {edit - I finally finished tonight! Let the decorating begin!} Some of that has been a little bit of a learning curve figuring out how to retrieve the info from a PC and taking it to a Mac. Thankfully, this process has become a lot easier (and even possible!) in the last few years...

I know, I know...I bore you...

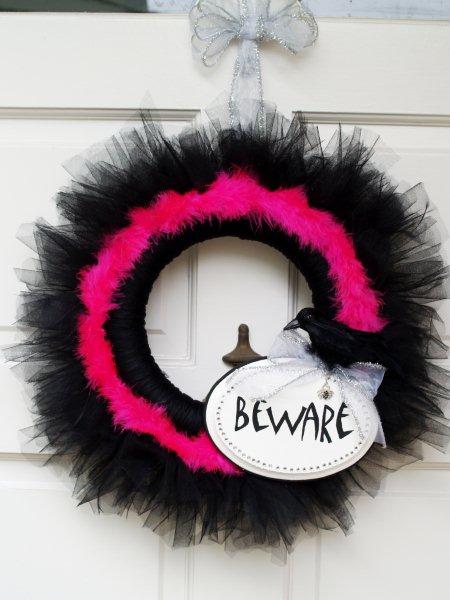
Anyway, here is a wreath I made for my daughters room (I'm all into the girly, girly stuff - I hope she will be too even when she's older)

I got my idea from here:


Beverly over at Flamingo Toes made this uber cute Halloween wreath. Even though I'm not really into the whole halloween thing, I was in love with this wreath. I took the idea and ran with it, changed up the colors, added my daughters initial and ended up with this:

                                  I know there's a wonky bit at the top - it's since been trimmed down a little!

I made the letter out of cereal box cardboard (classy, I know!),  covered in scrapbook paper and distressed with distressing ink.

I still haven't hung it up in the room. It's on the to do list. Hopefully by next week I'll be able to have the computer desk disassembled to make room for the crib and then I can begin decorating in all things girly :)

My sister has similar cute ones that she made for her daughters that you can check out here.

Friday, February 18, 2011

Apologies

Okay, I have to apologize for the lack of posts over the last few weeks. My little miss has been teething and it has not been pretty. It's been a long couple of weeks with very little sleep! I have only just today got caught up on all my blog reading as I have just felt too exhausted to even think about reading.

I do have a post ready to go, I just need to get the pictures off my other computer...yah, I still haven't transferred them to my laptop. Well, I did try but technology (and my thumb drive) didn't get along with me, so I'll have to try again once I'm getting more sleep. Anyway, I should have it up shortly.

Thursday, February 3, 2011

A {crafting} tragedy

So, no sooner than I post my project, when I close my front door (where the wreath was hanging). My husband came in asking if I was angry. "No", I replied "why?" He then holds up my wreath which is now in three pieces. Apparently I should have at least glued the hanging ribbon :(  Lesson learned... I'm not giving up on it though, I just need to seek out a roll of duct tape ;)

Sunday, January 30, 2011

A few weekend crafts

How is your winter going? Frankly, I'm really tired of it. This is what our  backyard looked like a few weeks ago, we've since had a few more dumps of snow on top of it.

 We don't dare park at the backdoor because it doesn't get tractor-ed out as often and we stand the chance of not getting out again if we do. We really need to get on getting a bigger vehicle - like maybe a truck <--- I can't believe I just typed that. I always swore I'd never drive a truck, but they just make more sense out here.

So while we've been snowed in I've been busy doing more craft projects. The other day I made 2 door draft stoppers

(okay, not the most exciting thing in the world) but they help keep the chilly drafts out from our basement door (prior to us moving in there was flooding in the basement which resulted in the floors and half the insulation in the walls being ripped out. It hasn't been fixed (neither has the flooding issue) so we tend to get quite the draft coming up from the basement) and the backdoor, which needs new weather stripping or something.

My more exciting craft was this little pretty.


I had intended on covering the whole wreath in twine and then making detachable decorations on it so that I could change it out for the seasons without needing a bunch more wreath forms. I starting winding and then ran out of jute. Oops. So for now the ribbon is covering up the part that doesn't have any jute on it until I can get some more to finish it off. I didn't glue anything on, just attached with safety pins so I can reuse the ribbon when I take it off.


I made a couple of hearts out of scrap felt and stuffed them with a bit of batting to give them a little bit of dimension. I then finished them off with a blanket stitch. I just learned how to do a blanket stitch. I really like the end result. What do you think?


I'm linking up to:

Making


Sumo's Sweet Stuff


" border="0"
alt="Pinkapotamus" />


Tidy Mom I'm Lovin It Fridays


Saturday, January 29, 2011

Clock Redo

So I've had this idea rolling around in my head for the longest time, but I wasn't brave enough to do anything with it. It wasn't until I entered the world of blog-land and saw all the many things that people re-do on a regular basis and still feel comfortable displaying in their homes, that I was inspired to finally go for it.

Here is the before picture:


Just your regular standard, cheap ugly clock.

While it served it's function (It helped me to be relatively on time for things for a number of years) It has never really matched our decor, and even more so since we moved into this place.

I recently bought some scrapbook paper off of someone who just isn't interested in scrapping anymore. I got a steal of a deal. (I love deals like this...ya know, let someone else pay the full price and then they sell it to me for a real discount later on - yes, I'm cheap frugal like that)
In amongst all the paper I found this beauty. I just love it! I decided this would be the new face of my clock. Just the right amount of colour and pattern without being too obnoxious to look at when you're trying to tell the time.


I used the glass piece of the clock to trace a template for the new face,

 and used this hole punch to cut out the centre circle (I love these things...I bought them a long time ago on sale one time at Superstore and they sat unused for the longest time, but I have made use of them so much in the last 6 months.)

In my newly acquired paper, I also found this other sheet. At first I didn't know quite what it was. (It really helps if you read the packaging, but I was in a hurry to see all the other goods when I acquired it, that I didn't stop to read the packaging.) I thought at first that it was an orange sticky paper, and I had no idea what I would do with it as orange tends to be on the bottom of the list of colours I would choose for, well, anything really.
BUT, after finally reading the packaging I found out that it was double sided sticky paper. (Pretty much a giant sheet of double sided tape.) Perfect!


If I had a silhouette or other cutting machine (My sister received one for Christmas - so jealous!) I would have used that for the next part, but since I didn't, I did it the old school way and just printed out some numbers on my computer, and used that as a template to cut out the numbers out of cardstock and the sticky paper.

After marking the clock for placement of the numbers, I adhered them to the face.

I spray painted the clock edge a dark satin brown. It turned out kind of glossy. I wish it were a matte finish, but this is all the hardware store had and I've got to work with what I can find!

                                                 This was me testing it out inside the clock before I adhered the numbers.

I then mod-podged the new face page and stuck it into the clock. This is where I had a problem.
Apparently, I did not use enough mod podge in spots (I haven't worked with it all that much and was afraid of making the paper soggy.) Or maybe it's just that I should have put something heavy on it while it dried. Regardless of the reason, I was, or more correctly, my husband was anxious for it to be back on the wall (since it's the clock that's referred to the most often in the house.) Anyway, all was good for the first 12 hours or so, but then some of the glue decided to let go and the paper curled up, which made the clock hands catch on it. My clock has been ticking away (the second hand works just fine), but the clock has been reading at 3:50 for a couple weeks now.

My husbands good natured sarcasm: "Way to make the clock look pretty, Jen".

Yes, dear, I'll fix it. Eventually. (Have I mentioned that I'm a procrastinator?)

Sorry, I missed taking pictures of some of the steps in between, but here is the final product.

(After a bunch of glue and frustration with getting the face to stick down, my clock is finally reading the proper time :) )

Monday, January 24, 2011

Skating

Here's what we were up to today.

We took the kids skating. This was only the second time my son has been on his skates. We took him once last year, but at that time I was about 5 months pregnant and he declared that it was "too slippery" after the first 5 minutes on the ice. We were going to enrol him in skating lessons this year, but they require them to be fully potty trained and at the time of registration he wasn't, so I guess we'll have to wait until next year.

We had meant to bring his skating helmet with us, but forgot it. I figured that we had grown up and learned to skate without helmets and survived to tell about it, so it should be fine! Ha!

Little guy had lots of spills, but he never cried. He had so much fun chasing after the hockey pucks that were randomly around the rink from prior hockey practices. At one point another older girl from in town was on the ice and was practicing her figure skating moves. I was pointing out to little guy the fancy moves she was doing. He replied "I have fancy moves, too, they're like...hiya!" Not sure what karate looks like on ice, and he (surprisingly) didn't show me either.


I have a feeling I'm reaaallyy going to feel today's fun tomorrow. I'm pretty sure it's been well over a decade since I was last on skates


Little missy rode in the sled the entire time. I think she enjoyed it, but we were laughing about the fact that her expression didn't change the ENTIRE time we were on the ice.

Hubby doesn't skate, so all the pictures of courtesy of him :)